 how-to
Why Ceramic Coating Hazing Happens: Fix & Prevent It
Table of Contents
- What Ceramic Coating Hazing Looks Like and Why It Happens
- Signs of Improper Ceramic Coating Application
- How Humidity and Temperature Affect Ceramic Coating Curing
- Ceramic Coating Curing Time in Cold Weather
- How to Remove Ceramic Coating High Spots
- Preventing Hazing: Surface Prep, Product Choice, and Technique
- Frequently Asked Questions
Last Updated: September 13, 2026
What Ceramic Coating Hazing Looks Like and Why It Happens
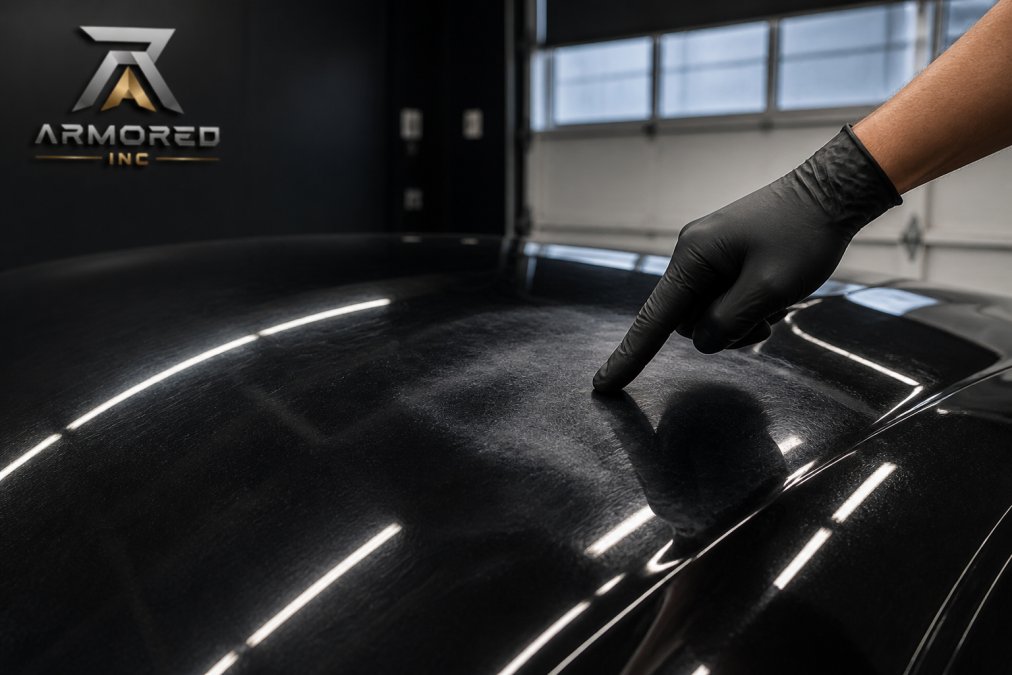
Ceramic coating hazing is a milky, cloudy or streaky discoloration that appears in or under a cured coating, usually caused by trapped moisture, uneven product thickness or an incomplete solvent flash during application. It is the most common complaint we hear from DIY coating enthusiasts.
Here's what most guides skip: hazing isn't one defect. It's three different problems that look similar on a dark panel and require completely different fixes. Armored Inc. has corrected enough failed coatings to know misdiagnosis wastes more money than the original mistake.
Most hazing is reversible, and almost all of it is preventable with the right prep, environment and patience.
Cloudy Patches vs. High Spots: A Visual Diagnostic Guide
High spots are raised, oily-looking smears where excess coating was left to cure without leveling. Cloudy patches are flat, milky areas where moisture or solvent got trapped under the film.
Here's how to tell them apart in sixty seconds:
| What You See | What It Usually Is | Primary Cause | Fix Difficulty |
|---|---|---|---|
| Raised, rainbow-edged smear | High spot | Too much product, no leveling wipe | Easy to moderate |
| Flat, milky cloud | Trapped moisture | Humidity too high at application | Moderate |
| Streaky, patchy film | Uneven leveling | Wrong towel or pressure | Easy |
| White haze at panel edges | Excess at seams | Product pooled in gaps | Easy |
| Dull, non-hydrophobic area | Failed cross-linking | Coating applied over contamination | Difficult |
Shine a 6500K LED light across the panel at a low angle. High spots catch the light and look wet; haze scatters it and looks flat. That test tells you which fix applies.
Signs of Improper Ceramic Coating Application
The clearest signs of improper application appear before the coating cures: swirl marks under the film, a grabby applicator, uneven flash times, and a finish that never develops proper hydrophobics. A coating applied over contamination or uncorrected paint locks that damage in permanently.
Watch for these during and immediately after application:
- The applicator drags or skips instead of gliding
- Flash time varies wildly between panels
- The surface feels tacky after the recommended leveling window
- Water beads unevenly the next morning
- Haze appears only in certain lighting angles
That last one matters: a coating can look perfect under shop fluorescents and reveal every flaw in direct sun. Always inspect in daylight before calling a job finished.
Application Errors That Cause Hazing
The biggest mistake is treating a coating like a wax. Ceramic coatings are silica-based liquids that cross-link into a semi-permanent film, nothing like a paste you buff off.
Common application errors that produce haze:
- Skipping the panel wipe after polishing, leaving polishing oils behind
- Applying in humidity above the product's stated window
- Working too large an area before leveling
- Using a plush towel instead of a low-pile microfiber for the leveling wipe
- Buffing with too much pressure and creating holograms in the clear coat
- Leaving high spots to "settle" instead of leveling within the flash window
How Humidity and Temperature Affect Ceramic Coating Curing
Humidity and temperature control two things: how fast the carrier solvent flashes off, and how completely the silica cross-links into a film. Get either wrong and you get haze, streaks, or a coating that never fully cures, but the failure mode depends on the coating chemistry, which is where most guides stop short.
Solvent-based vs. water-based: two different reactions
Ceramic coatings are not all the same chemistry. The carrier, the liquid that delivers the silica to the paint, determines how the product behaves in your garage.
Solvent-based coatings rely on the solvent evaporating before the silica cross-links. In high humidity, the saturated air can't absorb more vapor, so the solvent flashes too slowly, sits on the panel, and the silica cross-links around it into a milky, trapped haze. In low humidity the opposite happens: the solvent flashes too fast, the coating skins over before it levels, and you get streaks and high spots.
Water-based coatings use water as the carrier. They're more forgiving in humidity because water evaporates predictably, but they're sensitive to cold. Below roughly 15°C, the carrier flashes so slowly the coating stays open too long, picks up dust, and cures unevenly, in a cold Ontario garage in November, it can stay tacky for hours (nrc-cnrc.gc.ca).
That's why the same product that works flawlessly in a climate-controlled shop in July can haze in an unheated garage in October. The chemistry didn't change, the environment did.
What the numbers actually mean
Most ceramic coatings want ambient temperature between roughly 15°C and 27°C and relative humidity under about 60%, the manufacturer's ideal numbers, assuming a stable environment.
Here is what happens outside that window:
- Above 27°C: solvent flashes fast, leveling window shrinks, high spots form before you can wipe them
- Below 15°C: solvent flashes slowly, coating stays open, dust and moisture contaminate the film
- Above 60% RH: solvent cannot evaporate efficiently, trapped moisture haze forms
- Below 30% RH: solvent flashes too fast, streaks and dry patches appear
The interaction matters more than any single number: a 20°C garage at 70% RH is worse than a 28°C garage at 40% RH, because humidity is the limiting factor for solvent evaporation.
The Ontario problem
Southern Ontario doesn't give you a stable environment. Spring and fall swing ten degrees or more between morning and afternoon, and a garage reading 18°C and 50% RH at 9 a.m. can read 24°C and 68% RH by 2 p.m., right as you finish the hood.
That swing is the climate-specific challenge generic guides ignore. You're not applying in a lab, but in a Barrie garage with a door that opens and closes, a concrete floor that holds moisture, and weather that changes while you work.
What that means in practice:
- Measure at the panel, not at the thermostat. A wall-mounted gauge reads air temperature near the wall, not the surface you are coating. Use an infrared thermometer on the panel itself.
- Run a dehumidifier in the bay for at least an hour before you start. Sealed concrete floors release moisture for hours after a rain.
- Avoid applying on rainy or foggy days entirely. You cannot dehumidify fast enough to keep up with a door that opens to 90% RH outside.
- Work panel by panel. Do not coat the whole car and then start leveling. By the time you reach the last panel, the first one has already flashed past its leveling window.
- Log your conditions. Note the temperature and humidity for every job. When a coating cures perfectly, you want to be able to repeat those exact numbers.
Cold weather and curing time
Cold weather slows curing dramatically. A coating that flashes in two minutes at 22°C can take ten or more at 8°C, and if the surface drops below the product's minimum application temperature, the film may never cross-link properly, no amount of waiting will fix it.
For anyone asking how long ceramic coating curing takes in cold weather, the honest answer is: longer than the bottle says. Most manufacturers publish a curing window based on ideal conditions. Cold, damp air extends both the flash time and the full cure.
Practical cold-weather rules:
- Never apply below the product's stated minimum temperature
- Add 24 to 48 hours to the recommended full-cure time
- Keep the vehicle out of rain and off wet roads until the coating has fully set
- Avoid washing for at least a week, longer in cold, damp conditions
- Bring the vehicle into a heated space if the bay cannot hold temperature
Ceramic Coating Curing Time in Cold Weather
For anyone asking how long ceramic coating curing takes in cold weather, the honest answer is: longer than the bottle says. Most manufacturers publish a curing window based on ideal conditions. Cold, damp air extends both the flash time and the full cure.
Practical cold-weather rules:
- Never apply below the product's stated minimum temperature
- Add 24 to 48 hours to the recommended full-cure time
- Keep the vehicle out of rain and off wet roads until the coating has fully set
- Avoid washing for at least a week, longer in cold, damp conditions
- Bring the vehicle into a heated space if the bay can't hold temperature
How to Remove Ceramic Coating High Spots
High spots come off with a light machine polish and finishing pad, not more coating or a stronger chemical. Work gently, check progress often, and accept that you'll remove the coating from that small area.
Step by step:
- Wash and decontaminate the panel so you're not polishing grit into the paint
- Tape off surrounding trim and seams
- Fit a soft finishing pad to a dual-action polisher
- Use a fine finishing polish, not a heavy compound
- Work the spot at low speed with light pressure, two or three passes
- Wipe residue with a clean, low-pile microfiber
- Inspect under direct light before deciding whether to repeat
- Reapply coating to the polished area once it's clean and dry
Buffing pressure is where DIY jobs go wrong: press hard and you cut through the clear coat, so press lightly and let the polish work.
If the haze is moisture trapped under the film rather than a high spot, polishing won't help. Those panels need to be stripped, prepped and re-coated, which is exactly the kind of correction Armored Inc. handles for drivers across Barrie and the surrounding area.
Preventing Hazing: Surface Prep, Product Choice, and Technique
Prevention comes down to three things: a properly prepped surface, a coating matched to your environment, and disciplined technique during the flash and leveling windows.
Surface prep is non-negotiable. Decontamination, clay treatment, machine paint correction and a final isopropyl alcohol panel wipe remove the oils, fallout and residue that cause failure. Skip a step and you seal contamination under the film.
Product choice matters too: some coatings are formulated for high humidity, others for cooler climates. Matching product to conditions beats buying the most expensive bottle on the shelf.
Technique is the last mile:
- Work in small, manageable sections
- Level within the stated flash window, every time
- Use dedicated low-pile microfiber towels, fresh for each panel
- Inspect under direct light as you go
- Log your temperature and humidity so you can repeat a good result
SEMA professional detailing guidance and paint correction best practices from the Automotive Detailing Institute both stress the same point: prep and environment decide the outcome more than the product label does.
If you'd rather not gamble on your own garage conditions, Armored Inc. offers ceramic coating and paint protection film services with controlled bays and mobile options for customers who can't bring the vehicle in.
Hazing is fixable, but every correction attempt carries risk to your clear coat. If you're staring at cloudy patches on a car you care about, or searching for a ceramic coating installer near me in Barrie, let Armored Inc. handle it. We bring technicians experienced with matte and gloss finishes, and mobile service options so your vehicle never leaves your care longer than it has to. Contact us to book an inspection and get your finish back to the way it should look.
Frequently Asked Questions
Why is my ceramic coating hazy after application?
Hazing after application usually comes from high spots (excess coating that wasn't leveled), applying in high humidity, or skipping a proper panel wipe. If the haze appeared within hours, it's likely a high spot that can be removed with a light polish. If it developed over days, it may be moisture trapped during curing. Always check with your installer before attempting a fix.
How do I remove high spots or hazing from my ceramic coating?
For fresh high spots, use a fine finishing polish on a soft foam pad and light pressure, then wipe with isopropyl alcohol. For cured haze, a light machine polish may be needed. Always test a small area first. If the coating is less than 24 hours old, contact your installer, as the coating may still be workable and easier to correct without removing the whole layer.
Can humidity in Ontario affect ceramic coating curing?
Yes. High humidity slows solvent flash and can trap moisture under the coating, causing a milky appearance. Low humidity speeds flash but can cause the coating to skin over too fast, leaving streaks. Ideal conditions are 40-60% relative humidity and 15-25°C. In Ontario's humid summers or cold winters, installers often use dehumidifiers or heated bays to control the environment.
What are the signs that ceramic coating is failing?
Look for loss of hydrophobics (water stops beading), dull or chalky patches, and a surface that feels rough after washing. Hazing that doesn't wipe away, or reappears after a wash, often means the coating has failed in that area. Other signs include water spotting that etches into the surface and a decrease in gloss. If you notice these, have a professional inspect the coating.